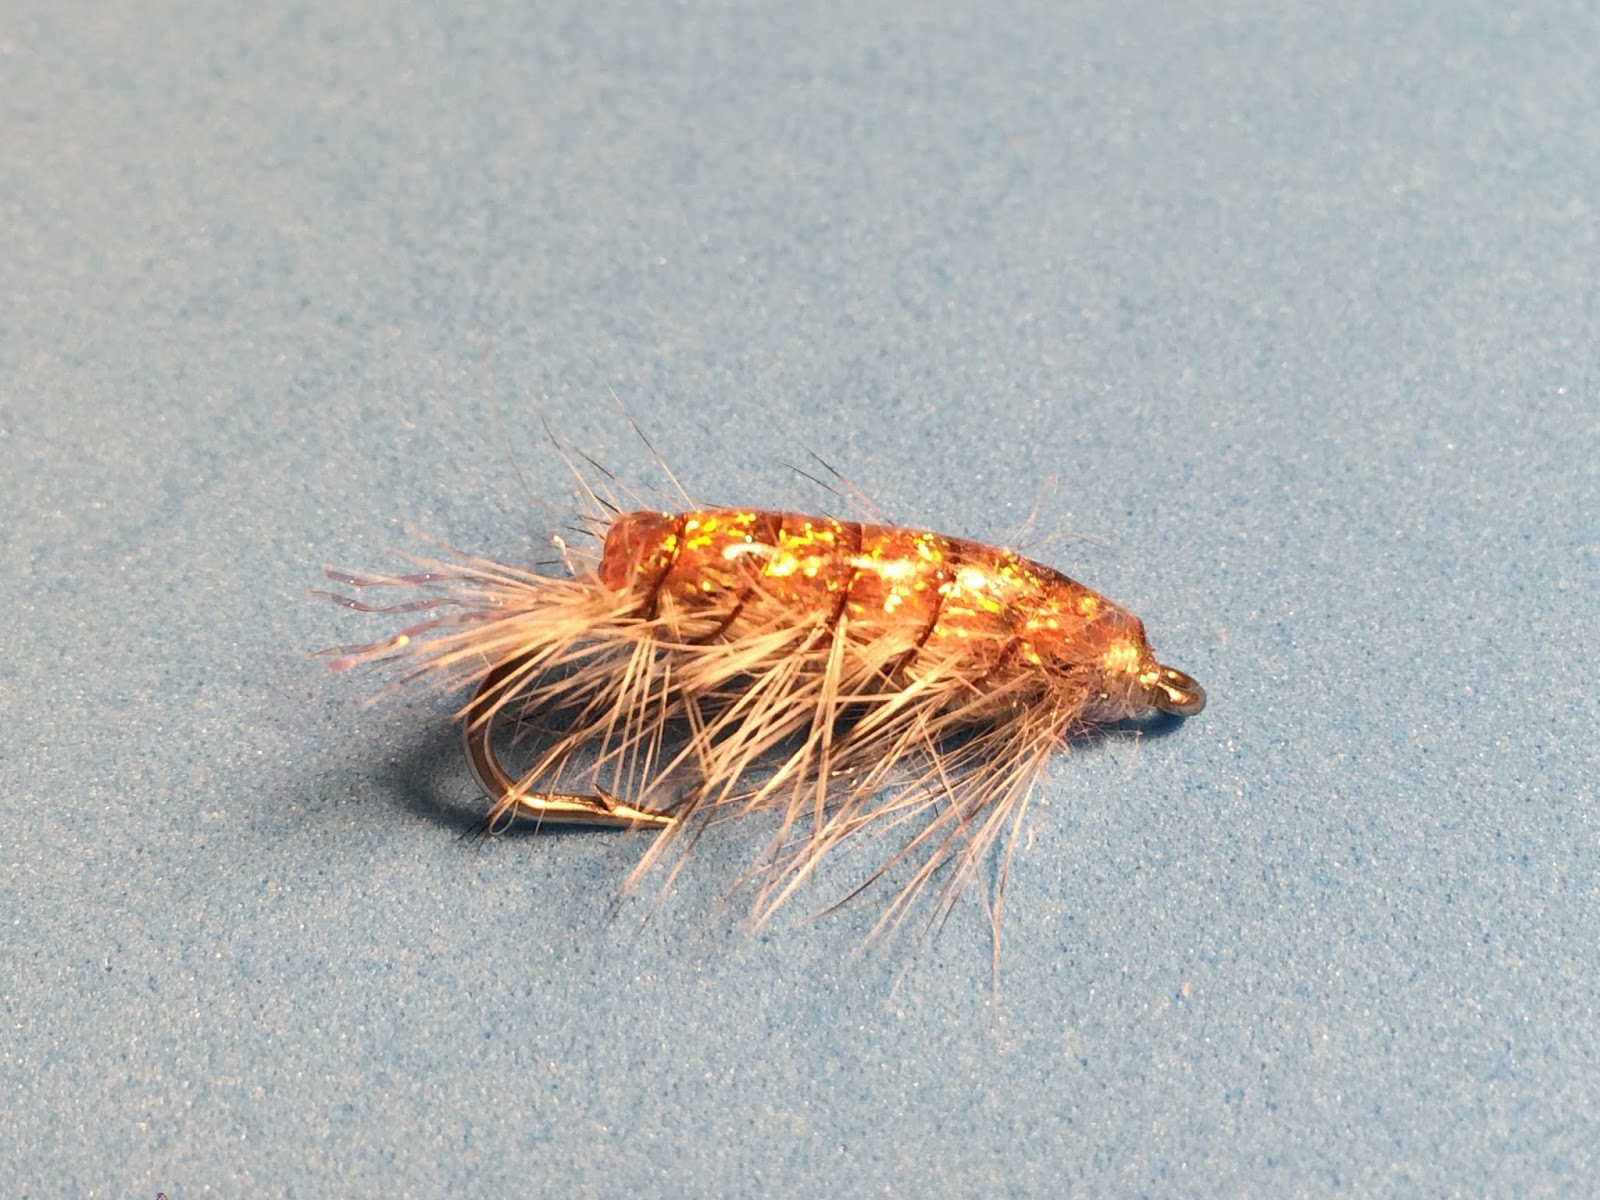
måndag 25 januari 2016

No.12 Peppermint rock Boobie


The Peppermint Rock Boobie 

This  boobie fly I composed and I started to fish with last year. It quickly became a favorite and delivered many nice rainbows. I wanted to get a little dimmed fly, yet the viable color combinations of red and white. I also wanted to exclude the tail on the fly to maybe find a pattern that provides more clean takes when the fish would otherwise just go and pull the flies' tails.

Material list
Hook: Kamasan B160
Thread: White UTC 70
Body: White Crystal chenille like Mini Gel Core Fritz, uv Diamond White and Medium Crystal Hackle, fl flame red. Both from Flybox.Co.uk 
Eyes: 6 mm White foam cylinder 

10 and 11. The Orange Nullermand and Converted Orange Nullermand

In the 80's when I seriously started fishing for seatrout on the coast with fly, the number of patterns that were counted as coastal flies were easily counted.
Just then, as now, it was the Danish coastal fishermen that where creative and including Jan Grünwald accounted for many published designs.
One pattern, that Jan had published, struck me early and that i used frequent was Orange Nullermand. A shrimp patterns that worked both as a hanger, on the leader and to bombarda fishing.
At that time there were not bombarda in itself. We fished with homemade throwing weights made of  round wood rods that was sanded down to a suitable form and weighted before they were painted and lacquered. For many years Nullermanden was a favorite pattern but with time it was left to oblivion, to a space in the fly box where it got to be undisturbed for many years, but then, a few years ago, it was put back on the fly-tippet and delivered a nice sea trout again.
After a while, when I was tying up new orange Nullermand I started thinking about converting the pattern with today's modern hooks and materials.
The converted pattern delivered almost immediately and now it along with the original pattern their place in the box


The Converted Orange Nullermand on top and the original bel ow


Converted Orange Nullermand
Materials List
Hook: Mustad C47 S shrimphook
Thread: Clear mono escape tying thread
Weight: 6-8 turns leadwire
Tail: 8-10 Golden Pheasant tippet fibers
Back: about 15 strands of dark olive or peacook green crystal flash
Back Cover: UV varnish
Rib: Small round goldtinsel
Hackle: Orange grizzly hackle
Body: Saltwater Dubbing, burnt orange,
Head: Tying thread

Original Orange Nullermand
Materials List
Hook: Double Salmon Hook size 6-12
Thread: Black
Tail: 8-10 Golden Pheasant tippet fibers
Back: 6-8 strands of Peacook hearl
Rib: Small round goldtinsel
Hackle: Orange grizzly hackle
Body: Orange chenille
Head: Tying thread


No 9. CDC Hatcher

CDC Hatcher

A fairly simple fly to tie the that often are cruelly effective when fish is crusingt and eating various insects in the surface. The fly can be varied in many color combinations and in various materials.
This particular variant is suited to fishing for hatching midges but by example tying in a couple of tails and tie a tapperad dubbed body with ribs we can imitate different hatching mayflies and excluded the tail we have a hatching caddispupa.
A basic pattern, in other words which is very adaptable to different fishing situations


CDC feathers have an incredibly good buoyancy and keeps much "air" both by the fine structure and its natural lubrication. 
 I prefer natural colored CDC feathers as they often have retained its natural lubrication. Colored CDC feathers have no natural fat when they are degreased so they can be dyed.


Materials List
Hook: Kamasan B100 Size 10-16 or similar hook. The important thing is that it's a curved hook  and with rather thin hook goods.
Thread: Black
Rib: A straw pearl flashabou
Body: Thin black flossilke or black binding wire.
Body Paint: Thin UV glue
Thorax: Peacook hearl
Wing bag: two pieces. gray or white cdc feathers. 


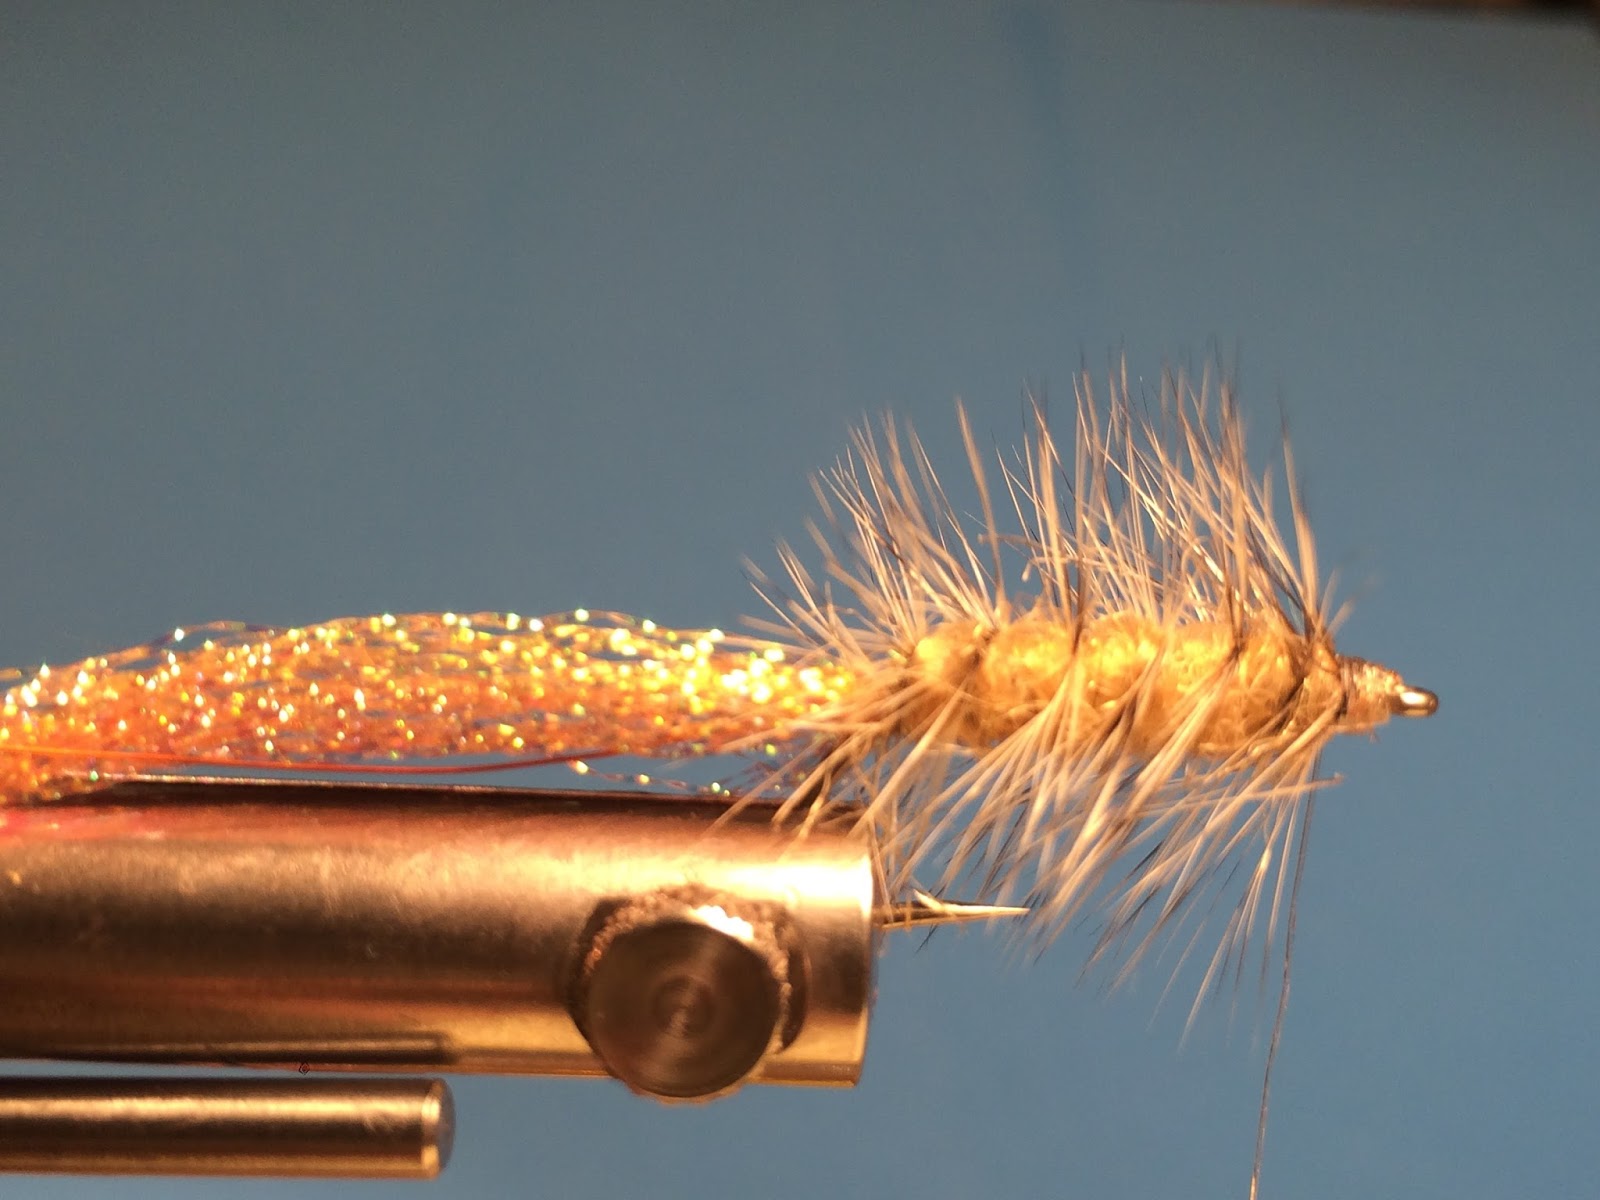
 1. Attach the flossilket or thread. Thread is prefered to the really small versions of this fly.


2. Tie in a straw flashabou and wrap flosset down to the bend. 
Cut away flashaboun sticking out the front of the hook shank / hook eye.


3. Wrap flossilket back and forth over the hook shank a few times so it forms a gently tapperad body. The body must cover about 2/3 of the hook shank.


4. Wrap flashaboun 6-7 laps forward over the body as a ribbing.


5. Apply a drop of thin UV varnish. 
I prefer Solarez UV products. It hardens incredibly well and is 100% non-stick


6. Distribute the UV varnish with a needle so it covers the hole body


7. Cure the UV varnisch a few seconds with a UV lamp.


8. Now take a CDC feather and attach it loosely in the spring tip of the hook over the side of the body beginning. The CDC feather must be attached so that the concave side, inwardly curved side facing up. The feather should be fastened so that it is located in a 30-degree angle out from the hook. 
Easily seen in the image nr10.


9. Pull back the cdc Feather slighty so it get the prefered angel and so that the tip does not protrude above the hook. Attach the feather a little harder with a pair of tighter turns with the thread.


10. Repete the procedure with the next feather. Here you see how the feathers are angled out from the hook.


11.
11-12. Tie in 3-4 peacook hearl on top, in between the CDC feathers


12,

13. Wind the peacock hearl forward towards the hook eye


14. Attach the hearl a few millimeters before the hook eye and cut off the remaining parts


15. We have now reached the stage where we should continue with the CDC feathers and now it is important that one has left little space between peacook hearl and the hook eye. Otherwise it will be too tight and there is a risk that you will cover parts of the hook eye when the fly is finished.


16. Take one of the cdc feathers and fold it over the chest so a small loop, bubble,  is formed. 
Secure with a couple of loose thread turns.


17. Adjust the feather loop by pulling the feather, for example with a hackle pliers while holding back the thread so it does not slide over the hook eye. The loop, the bubble, must should encapsulate the chest. This bubble has an amazing ability to trap air that contributes to the fly's buoyancy. Cut off the excess part of the cdc feather and attach it with a pair of tighter turns of thread.


 18. Repeat with the other feather.


19. From below you can see how the chest has been coverdt with the cdc feathers.


20. Cut away the rest of the second cdc feather also.


21. Finish with a small head. Attach and cut the thread. Varnish the head and the fly is finished


22. As i said, you can tye this type of flies in many varieties, but my favorites are this type, with either natural gray or white wing.


torsdag 21 januari 2016

No 8. Tricolor Muddler.


Tricolor muddler has a color combination that is often found in my flypattern when i´m fishing after rainbow trout.
The combination of orange, yellow and white are often a winning combination and when it´s combined with deer hair as thorax / head we get a particularly poisonous fly.

Material list
Hook: Streamer hook strl 8-4
Thread: Heavy white tying thread
Tail: fluo orange marabou. The tail should be about 1/2 the length of the hook
Body: Pearl ice dub
Wing: Fluo yellow marabou. The wing should go back to the end of the tail on top of the wing I tie into 4 straw pearl flashabou
Head / over the wing. White deer hair.

No 7. The Parrot


The Parrot is a fly that I use often when the water temperature is a bit lower. Both sea trout and rainbow trout seem to like it.

Material list
Hook: Maruto C41SE. Streamer hook with a bent hook shank, size 4-8
Thread: Black
Tail: A small stack of hot orange fox hair. The length should be about 2/3 of the hook shank.
Body: Pearl Crystal hackle 5mm.
Wing: Fox hair. Yellow with green Highlander on top the yellow. The wing will reach back to the end of the tail. In between the different layers of the wing I tie in a 2 strands of pearl flashabou.
Hackle: A well marked Teal feather.
Overwing: A small stack of black fox hair tied in over the hackle and the yellow / green wing.
Head: Black tie wire lacquered 3-4 times and then painted eyes on the sides. White or yellow background with black pupills.
If you want to add some more weight to the flie you can use silver chain eys insted of painting the eyes.

onsdag 20 januari 2016

No 6 Green Mean Machine


Now you may think I'm crazy. 
What is it for kind of fly?
 It is one of my "normal" flies for fishing for rainbow trout. 
I have for many years been fishing, quite frequently, with hefty mouthfuls flies. 
Rainbows often fall for these monsters flies and often when the usual patterns do not deliver. 
Just this pattern has a very high buoyancy and I fish them much like a bobbie fly. i.e. with a fast sinking line and relative way short streamer, a maximum of 1.5 m long.

Materiallist
Hook: Gamakatsu F314 size 2 or 4
Thread: Strong thread that realy manage to tie down deer hair. I prefer white thread.
Tail: Black striped olive marabou
Boddy: Chatreuse green deer hair, 3-4 bundles
Ben: Six pieces Chatreuse green sililegs with black stripes on each side of the fly.
Eye: Olive foamcylinder 5-6 mm in diameter and about 12-15 mm long. Hen you have fixed the foam cylinder fix it with a dropp of superglue. 
Remember that after yoa have tide the tail you have to tie in the eyes and then the legs before you finish the fly with the boddy.


Green mean machine


tisdag 12 januari 2016

No 5. Grey seatrout zonker


The Grey seatrout zonker is a good and productive patterns for fishing for seatrout on the coast of Skåne in Sweden. It is a good imitation of various bait fish such as sticklebacks, small herring and IF you use alternative colors such as various shades of brown, it will be a good imitation of eelpout and gobies

Material list
Hook: Partridge CS54 size 6 and 4.
Thread: Transperant monofilament thread.
Weight: 8-10 turns of leadwire around the hookshank.
Tail/wing: Gray zonkerstrip. 3 mm wide.
Body: Pearl ice dub. 
Throat: Small bunch of red ice dub.
Eyes: 3D epoxy eyes, 4-5 mm.
Head: The eyes coverd with UV resin. 

No 4. UV Epoxy Gammarus


UV Epoxy Gammarus


Material list
Hook:  Maruto SS-1930 size 8 or 6  
Weight: 6-8 turns of lead wire
Thread: Clear nylon thread
Antenna/tail: 4 strands of crystal flash. This colour is something like pale orange, almost tan.
Rib: Copper wire
Body: Saltwater dubbing. Transparant Tan
Hackle: Grizzle Cook hackle
Back: About 20 strands och the same crystal flash you used to the antenna.
Shell: UV resin


1. Wrap the hook with 6-8 laps lead wire.


2. Attach the thread and secure the leadwire. After that fasten the copperwire.


3. Take 4 crystal flash and tie them in as antennas.
Cut them so length will be about 10 mm.


4. Take about 20 strands of the same crystal flash and tie them in on top of the antenna.  


5. Attach the grizzle hackle in the tip on top of the crystal flash.


6. Dub the thread.


7. Wind a boddy. It should be a Little thicker in the middle

8. Wind the hackle 6-7 turns around the boddy. 


9. Fold the crystal flash over the body and hackle and attach it just behind the hook eye.


10. Cut of the rest of the crystal flash

11. Rib the body with 6-7 turns of the copper wire.

12. Fasten the copper wire. Cut it of and form a neat head with the thread and cut of the thread.


13. Cover the back with a layer of UV resin.


14. Cure the resin with UV lamp.


15. The gammurus flie are now ready for action.